How To Post A Photo On Instagram
There are over 200 million active people on Instagram, over 20 billion photos shared and 60 million photos posted a day, so there is a chance you have heard of this phenomenon. But what exactly is Instagram? It is an app for photos, and now videos as well, that can be enhanced by a digital layer aka photo filter that you can use on your standard photos to give the effects of professional editing.
If you are new to the Instagram world there is a lot to learn, however; learning the basics to get started, like how to post pictures on Instagram won’t take longer that 5 minutes or however long it takes you to read the rest of this article.
Getting Started:
Of course there are the basics like downloading the app, registering and adjusting to the proper settings for yourself as well as setting up your notifications. If you have a Facebook it will allow you to find friends to follow that you are friends with on Facebook, and you can also choose if you would like to link any of your other social profiles like twitter, four square, Tumblr, etc.
The Bread and Butter
Photos! Obviously once taking a peek at Instagram you realize it is all about sharing photos. All you have to do is click that center icon that looks like a “camera” it is a square with a circle in the middle. Clicking on this should activate your camera and from there you have some options.
1. Take a photo as you normally would and just press that big blue circle button in the middle to capture your shot
2. Take a “selfie” by hitting the icon at the top center of the screen with the arrows going around the “camera” icon. This will flip the camera and have all eyes on you
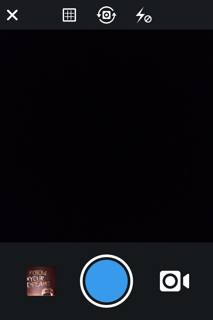
3. Click the square next to the big blue circle, this will take you to your photo albums that are actually on your phone and you can choose from one of those to share as well
**Be aware: Instagram sizes photos to be perfect squares, so if you choose a picture from your phones camera album you might need to do some cropping or zooming in to fit the square frame
Add In Some Framework and Filters
Here is where all the “professional” photographers stake their claim. Once you choose a photo click where it says next in the top right hand corner. This is where the editing stage begins, one of the biggest appeals for people who use instagram. There are numerous options in the editing stage:
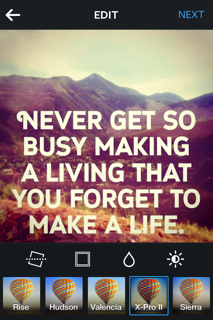
1. Filter: The bottom of the screen will show all the different filters you can choose from to make your photo look its best, so choose wisely. .
Ex: This shows that the filter X-Pro II was chosen.
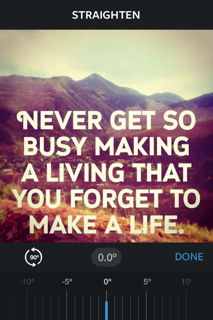
2. Image Rotation: Click on the bottom left icon, the tilted square with the dots going thru it if you want to rotate your chosen photo. Once you chose how much or how little you want to rotate it click on the done button.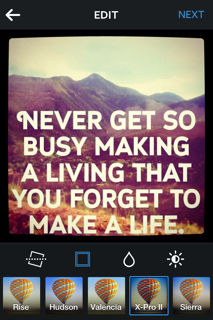
3. Borders: Click on the second icon on the bottom left of your screen, the small square. This will apply a border to your photo, however; the borders only are applied in certain filters.

4. Tilt-Shift: That would be the raindrop looking button. By clicking this you can have your photo focus on a certain amount of your picture and blur the rest slightly, kind of like a special DSLR lens. . If you click the raindrop once, it will focus on the portion of your picture in a circular fashion, if you click the raindrop twice it will focus on your picture with a horizontal bar.
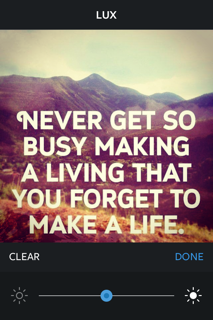
5. Lux Effect: The last icon in the bottom row that looks like the sun. This will enrich the colors of your image, either light by sliding left or darker by sliding right. Play around with the sliding to find the best color effect for your photo.
Publishing
Once you have figured out your best angle to take on your picture with the edits all that is left to do is share it to the Instagram world. Tap the next button on the top right hand corner and it will take you to the last stop before it is published.
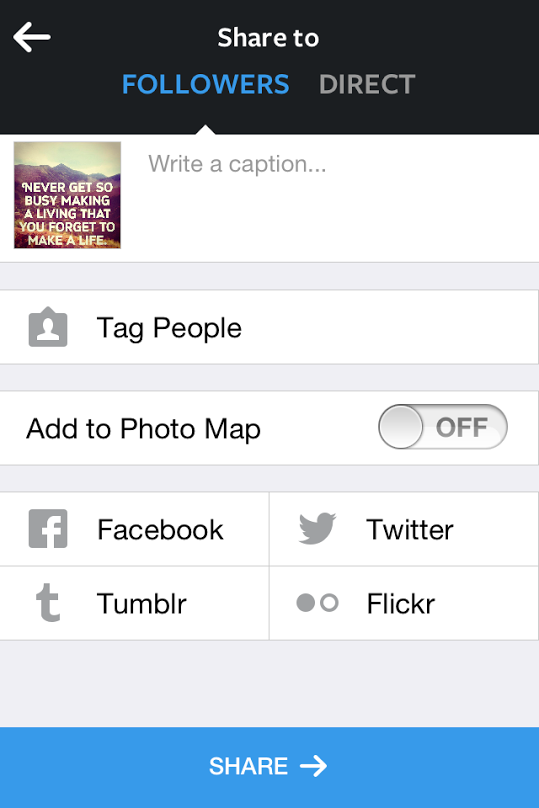
1.From here you will want to write a caption for your photo and maybe add a couple of hashtags. 2. Tag some friends you want to share the post with or if they are in your picture by clicking the “tag people”
3. Add to Photo Map will capture where this photo was taken or uploaded
4. Decide if you want to also attach this photo to any of your other social media channels
5. You can chose to let this photo be seen by all your followers or chose directly who you want to share it with.
6. Last but not least, hit that bright blue SHARE button!
Apps on Apps on Apps
Now that is just the most basic way to pick, edit, enhance and share your photo. If you want a more advance edit on your picture there are apps that you can download that will allow a more in depth edit for your Instagram photo.
1. Slow Camera Shutter Plus: This app allows you to take long-exposure images, so get artsy and grab some glow sticks and capture some glowing letters or shapes.
2. PicFrame: Allows you to choose multiple images and organize them into a collage so you can post all of the photos you want into one single collage image.
3. Overgram: Adding text to your photos is what this app allows you to do. It has a variety of fonts to compliment your images.
4. DXP Free: Gives double-exposure vibes to your photos, makes blending and mixing images as easy as 1,2,3.
5. Frame Magic: With over 50 customizable layouts and patterns to choose from, you are bound to get the photo you want. It also allows you to take multiple shots with an in-frame multi camera function.
6. PicsArt: An Android exclusive, this app creates effects such as watercolor, pencil, comic and contours. You can also add text, stickers, borders and create collages in the picture editor.
7. Everlapse: This app takes all your best Instagram photos and creates a video for you to share on your Instagram feed.
There is plenty more to learn about Instagram, however this is the basic and most important step to know, since it is all about pictures. Of course technology is always changing and new versions of apps are bound to happen, but as long as you know the basic steps and icons to post your photos to Instagram, you shall be set.
Latest posts by Marcela De Vivo (see all)
- The Evolution of Data: Creating Intent-Led Digital Strategies - 29 January, 2019
- Productive Things To Do When You Are a Freelancer Job-Hunting - 18 July, 2018
- What KPIs Should I be Using to Measure my SEO Campaign - 21 July, 2017

